
As the first entry in Her Interactive’s Nancy Drew mystery game series, Secrets Can Kill is a quintessential experience. It is loosely based on a Nancy Drew Case Files book with the same name published in 1986. The game was originally released in 1998 and came with two different CD ROMs which players had to switch back and forth between to get to different areas throughout the game. Thankfully, Secrets Can Kill got a much-needed remaster in 2010 which brought fans a much smoother gameplay experience without changing the plot. It is still one of the shorter games in the series, clocking in under two or three hours if one knows what one is doing… That’s where this walkthrough comes in handy!
I’ll first introduce a little background information on the story and characters before diving into the full step-by-step guide.
All Characters, Suspects, and Story Background in Secrets Can Kill
Jake Rogers – The murder victim. He was apparently beat up and pushed down the stairs and pretty much everyone had some beef with him. Our goal is to find out who killed him and why.
Detective Beech – He recruited you to help him go undercover to solve this murder case.
Hector “The Hulk” Sanchez – The school jock that will do anything to succeed in his football career.

Connie Watson – The sketchy hall monitor who has a romantic past with the victim.

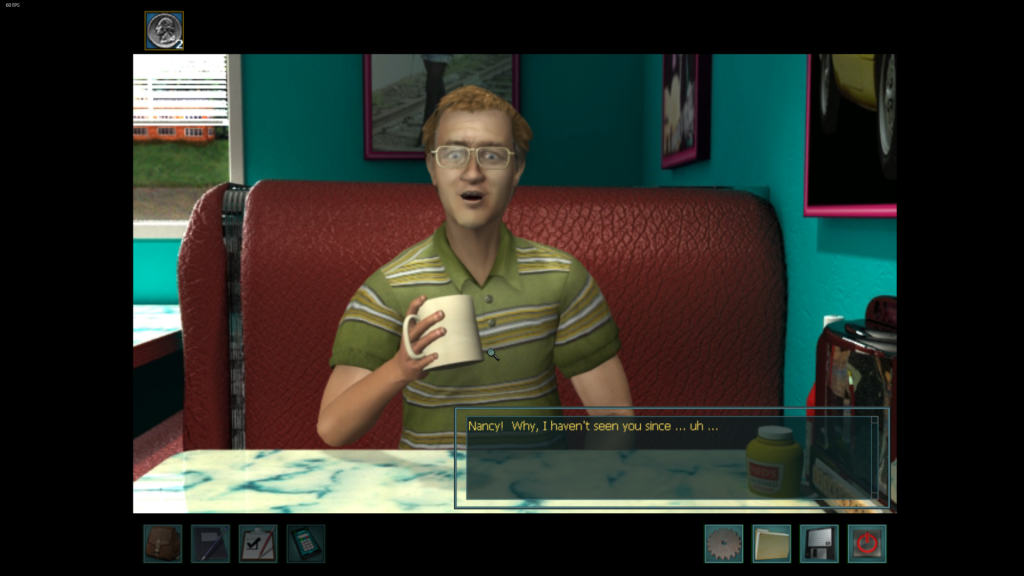
Daryl Gray – The student body president who works at the diner where Jake worked.

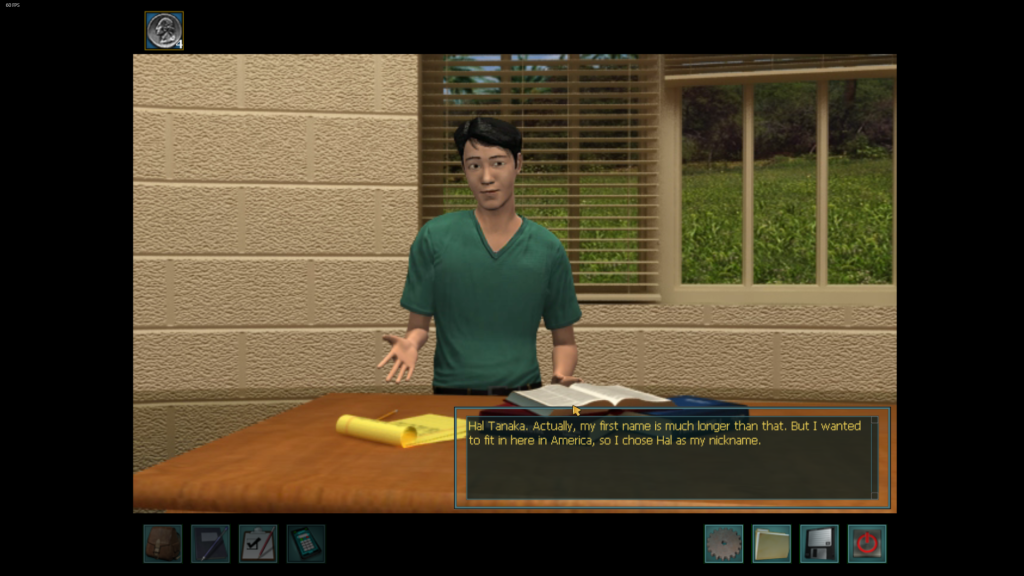
Hal Tanaka – the foreign exchange student who has his entire family’s hopes and dreams riding on his ability to get into a good medical school.
Full Walkthrough for Nancy Drew: Secrets Can Kill Remastered
I usually play in Junior Detective mode, the main difference being that you can call Ned for hints and Nancy keeps a to-do list. Senior mode is the same game but doesn’t have these two features and some of the puzzles are harder.
Exploring Aunt Eloise’s house
Aunt Eloise leaves a note saying the key to the school library is in a safe at her house and the combo to the safe is hidden somewhere in the house. Note the letter on the table with Greek letters: Sigma Phi Kappa Delta. If you know Greek letters, you might notice some are lowercase and some are uppercase, for some reason. You’ll find the safe behind a tapestry in the entry way.
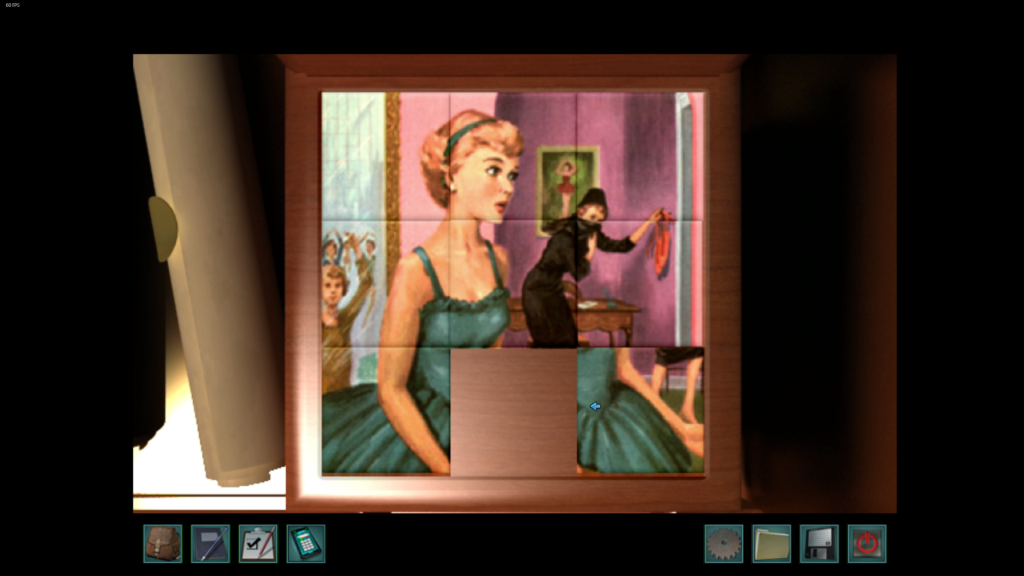
Enter the Greek letters σΦΚδ from the sorority letter into the safe (don’t enter them wrong). Inside, you’ll find the key to the library hanging, grab that. There’s a puzzle box with sliding tile puzzle. My best tip for solving this is once you know where a tile is supposed to end up, try to “snake” it into position rather than just doing a straight shot. Find the (mostly) finished puzzle below.
Inside you’ll find Aunt Eloise’s password to the school computer.
- Login: Eloise DREW
- Password: O WISE ELDER
In the living room of Aunt Eloise’s house, you can look at a bunch of stuff. Most importantly, there is a key to the teacher’s lounge inside a book on the bookcase. There are also some coins sparkling at you from inside the chest. Coins can be used to play games at the Diner.
Go to leave Aunt Eloise’s house and get a call from Detective Beech. Meet him at Maxine’s Diner and talk to him. Talk to Daryl Gray, the student council president and one of our suspects. You can also play the jukebox or the Barnacle Blast game in the diner.
Go to the kitchen area and snoop around. You’ll find a crumpled up note from Connie telling Daryl she can’t go to the Sadie Hawkin’s dance with him. See a work schedule and closing procedures. Pick up a ladle from a bin on the table. Under the flammable materials sign there’s a pair of bolt cutters propping up a pipe. Take it and replace it with the soup ladle or else you’ll cause an explosion!
Let’s go check out the scene of the crime – Paseo Del Mar High School. Be sure to explore all the bulletin boards and signs for hidden messages. Nancy will take note of the important stuff in her Journal.
Talk to Hector “The Hulk” Sanchez at the Gym. If he cuts off the conversation, talk to him again until there are no new conversation topics. Next to Hulk, there’s a judo poster with a number you can call just for fun. You can also buy a soda here but its not necessary. Talk to Hal Tanaka in the Study Hall. Talk to him again until there are no more dialogue options. He says Jake needed to look at a phone to remember his locker combination. Talk to Connie, the school hall monitor, in the student union. Talk to her again until there are no more options. There’s a soda machine here too. If you try to get into the teacher’s lounge, Connie won’t let you… We need a way to distract her elsewhere.
Talk to Hulk, Hal, and Connie again. Then go to the library and use that key we got in Aunt Eloise’s house.
Exploring the Library
Read all the books on all the shelves that you can find. Check out the map drawer and magazine shelf as well to find more hidden messages and miscellaneous info, some of which comes from other ND games. The encyclopedia shelf has a book of Kanji and Nancy mentions the medallion that Connie is wearing is Kanji for crane. Notice there are computers in the Reference area that you can use to do a catalog search.
In the upstairs of the library, you can find a periodic table of elements on the wall – this will probably come in handy later!
If you’ve looked at every single thing possible in the library, you can leave and get some other stuff done, like opening Jake’s locker and getting into the teacher’s lounge.
How to figure out Jake’s Locker combo
Jake’s locker is the one with caution tape in the hallway leading to the Gym and Library. Hal gives you a clue when you talk to him about how Jake looks at his phone when opening his locker, so Jake’s locker combination must be related to the letters on each number of a phone keypad.

If you call Ned (on Junior detective mode) he’ll give you a hint that you need to spell out Jake’s name. Hal said he uses a phone to open his locker so spell out J-A-K-E in the phone keyboard to get 5-2-5-3. Try out 5253 as Jake’s locker combination.
Find an empty VHS case and a judo magazine that mentions a Paseo Del Mar judo contest winner called the Masked Marauder… There’s a book in the library about Judo and another about Kanji. Maybe these two pieces of info could be used to find out who this masked marauder person is.
Find a newspaper article about a break-in at a pharmacy. A bunch of Hectinol was stolen, is there info about this drug in the library? There’s also a book of English essays including one on etiquette.
How to get into the Teacher’s Lounge in Secrets Can Kill
Talk to all the suspects again and keep talking to them until all the conversation topics are done.
Go to the soda machine next to Hulk and type in the soda machine alarm code, GRAPE, GRAPE, ORANGE, COOL. Hulk will yell at you. Go tell Connie that she needs to go fix it. She leaves and its time to snoop! Read the paper she’s been writing on.
Check the filing cabinets to read Hal’s student file. His essay looks like that one in Jake’s locker! Cheater cheater pumpkin eater. There’s an article about Gray Investments doing poorly.
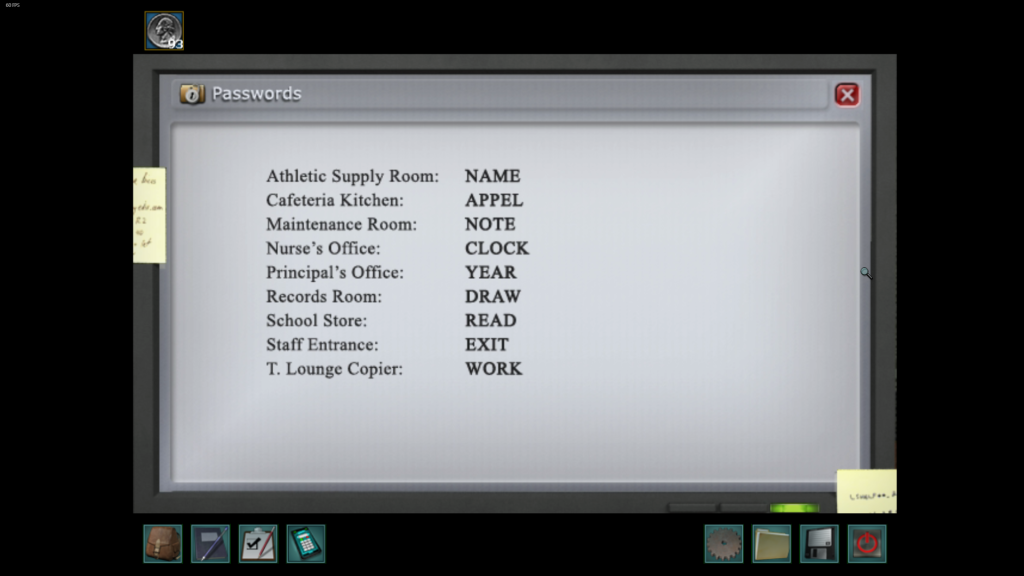
Go to the computer and enter Aunt Eloise’s username (Eloise Drew) and password (O wise elder). Caps do not matter. Read every single thing in the computer, especially the passwords! We can now figure out how to get into the maintenance closet using the word “NOTE” and the braille book from the library.
After leaving the teacher’s lounge you should get a rather threatening call from Mitch Dillon. You can call him back and he denies calling. Talk to all the suspects again if you need to. Confront Hal about the cheating if you haven’t. Approach the Gym where Hulk usually is to eavesdrop on an argument between him and Connie.
Back to the Diner
Leave the school and go to the diner to talk to Daryl. He says our “uncle Steve” (AKA the Detective Beech) has left the dinner and has acted weird before. Daryl gives us a note from Dillon HVAC to meet him in the Boiler Room. That’s not sketchy at all!
How to enter the Maintenance Room and Boiler Room
The boiler room is below the maintenance room, which is located to the right when you enter the high school and turn right again instead of going left to get to Connie and Hal. The combination lock to the maintenance room is in Braille. Using that book from the library and the password “NOTE” from the teacher’s lounge, we can enter.


- Top rightmost corner
- Top middle right
- Top leftmost corner
- Middle row, rightmost
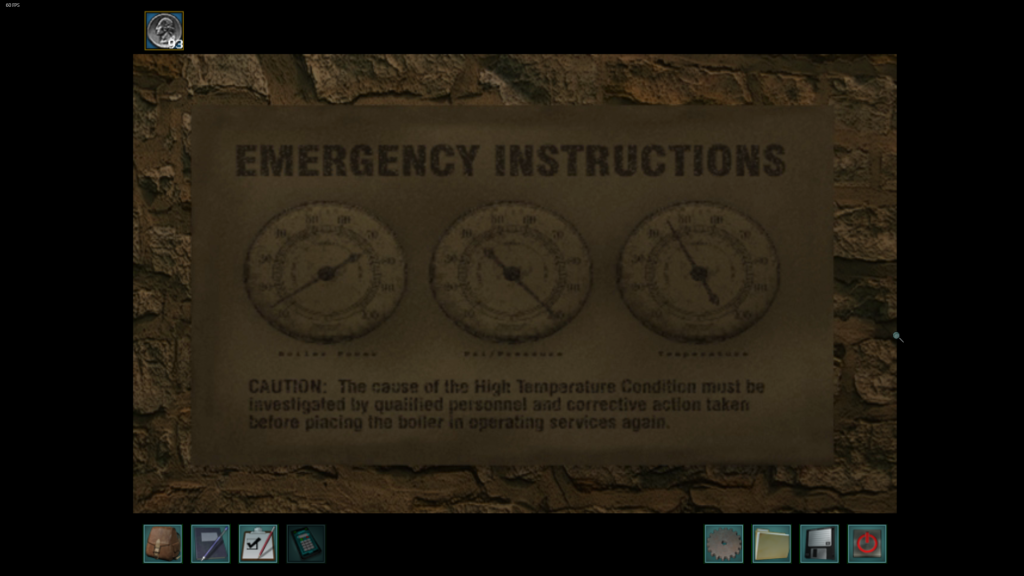
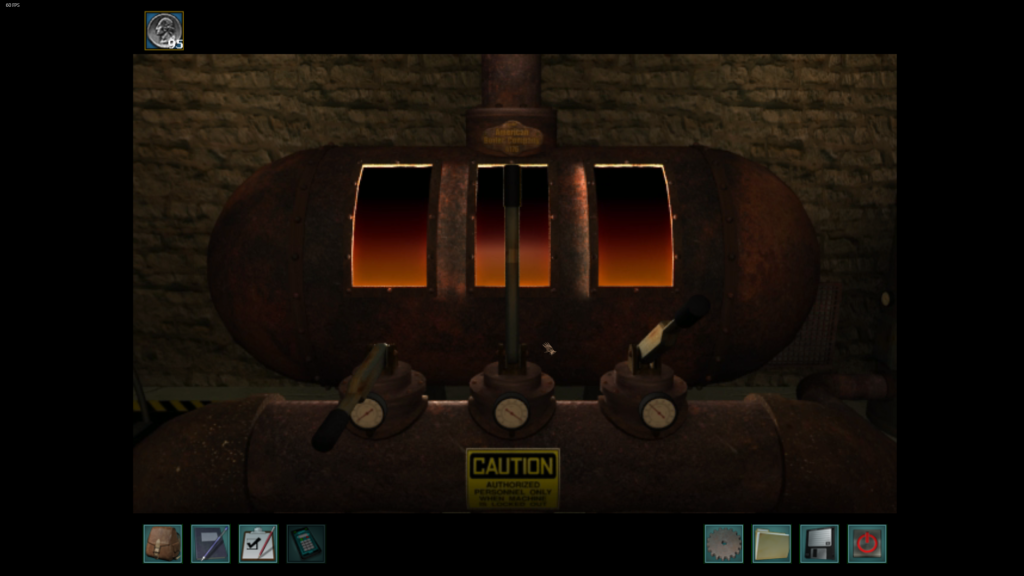
Once you enter, click the elevator button to go down to the boiler room. Oh no! Someone has rigged the boiler to explode! Keep calm and look around. Note the instructions on the wall. Get some gloves from a toolbox on the ground. Note that the school was built in 1967. Enter 1-9-6-7 into the combination lock. Now to solve the boiler puzzle. Using the gloves you found, set the levers to look like the image on the wall.
Look around some more and find the Matchbox from Maxine’s. It has a little mercury symbol on it. There’s also a grate behind the boiler where you’ll find a VHS tape. Go through this grate to get out.
Go back to Aunt Eloise’s house to view the VHS tape on her TV. Oh boy, a trove of blackmail on all our suspects!
- Hulk had the stolen Hectinol in his locker.
- Connie takes her masked marauder mask off and puts her judo trophy in her locker.
- Hal was copying that English essay in the library.
All hidden messages in Nancy Drew Secrets Can Kill


After searching through the diner, school bulletin boards, library, and teacher’s lounge, you should have seen 18 messages with secret codes. All of them have a number: letter combination and most of them have other messages to decode as well. Here are all 18 of the hidden messages found throughout the game.
- Senior Essay Contest bulletin – Zn:D1
- Take all the underlined letters to spell: “put elements in order to open puzzle”.
- All those notes throughout the game with elemental symbols will be important!!!
- Take all the underlined letters to spell: “put elements in order to open puzzle”.
- Bulletin above the honor student – Ir:D2
- “find the morning edition And discover another crime, The answers in black and white To who will do the time”
- Backwards letters bulletin – Zr:R4
- Reading each line backwards gets “GRAPE, GRAPE, ORANGE, COOL will play the alarm in the school”.
- Aren’t these soda favors? Connie mentioned a pesky soda alarm jokester earlier.
- Reading each line backwards gets “GRAPE, GRAPE, ORANGE, COOL will play the alarm in the school”.
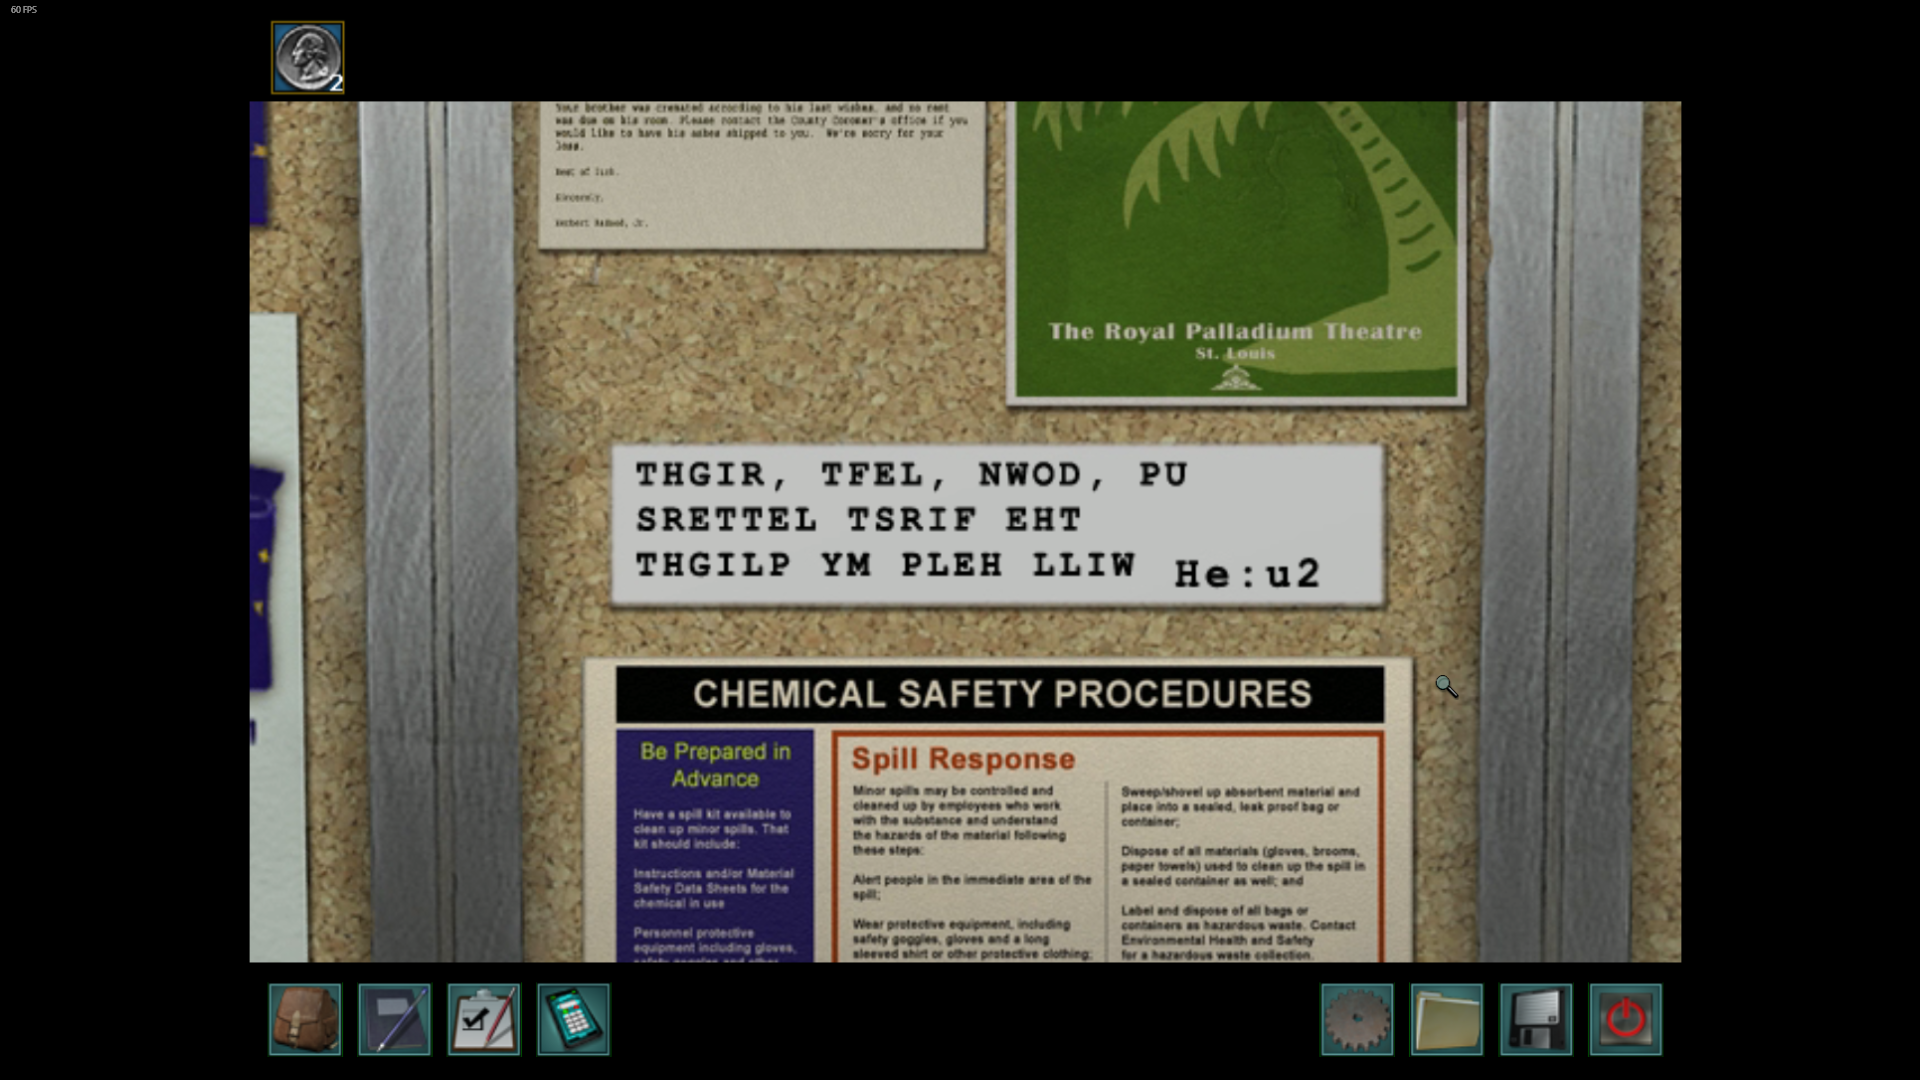
- Another backwards letters bulletin – He:u2
- Read backwards it says, “Up, down, left, right, the first letters will help my plight.”
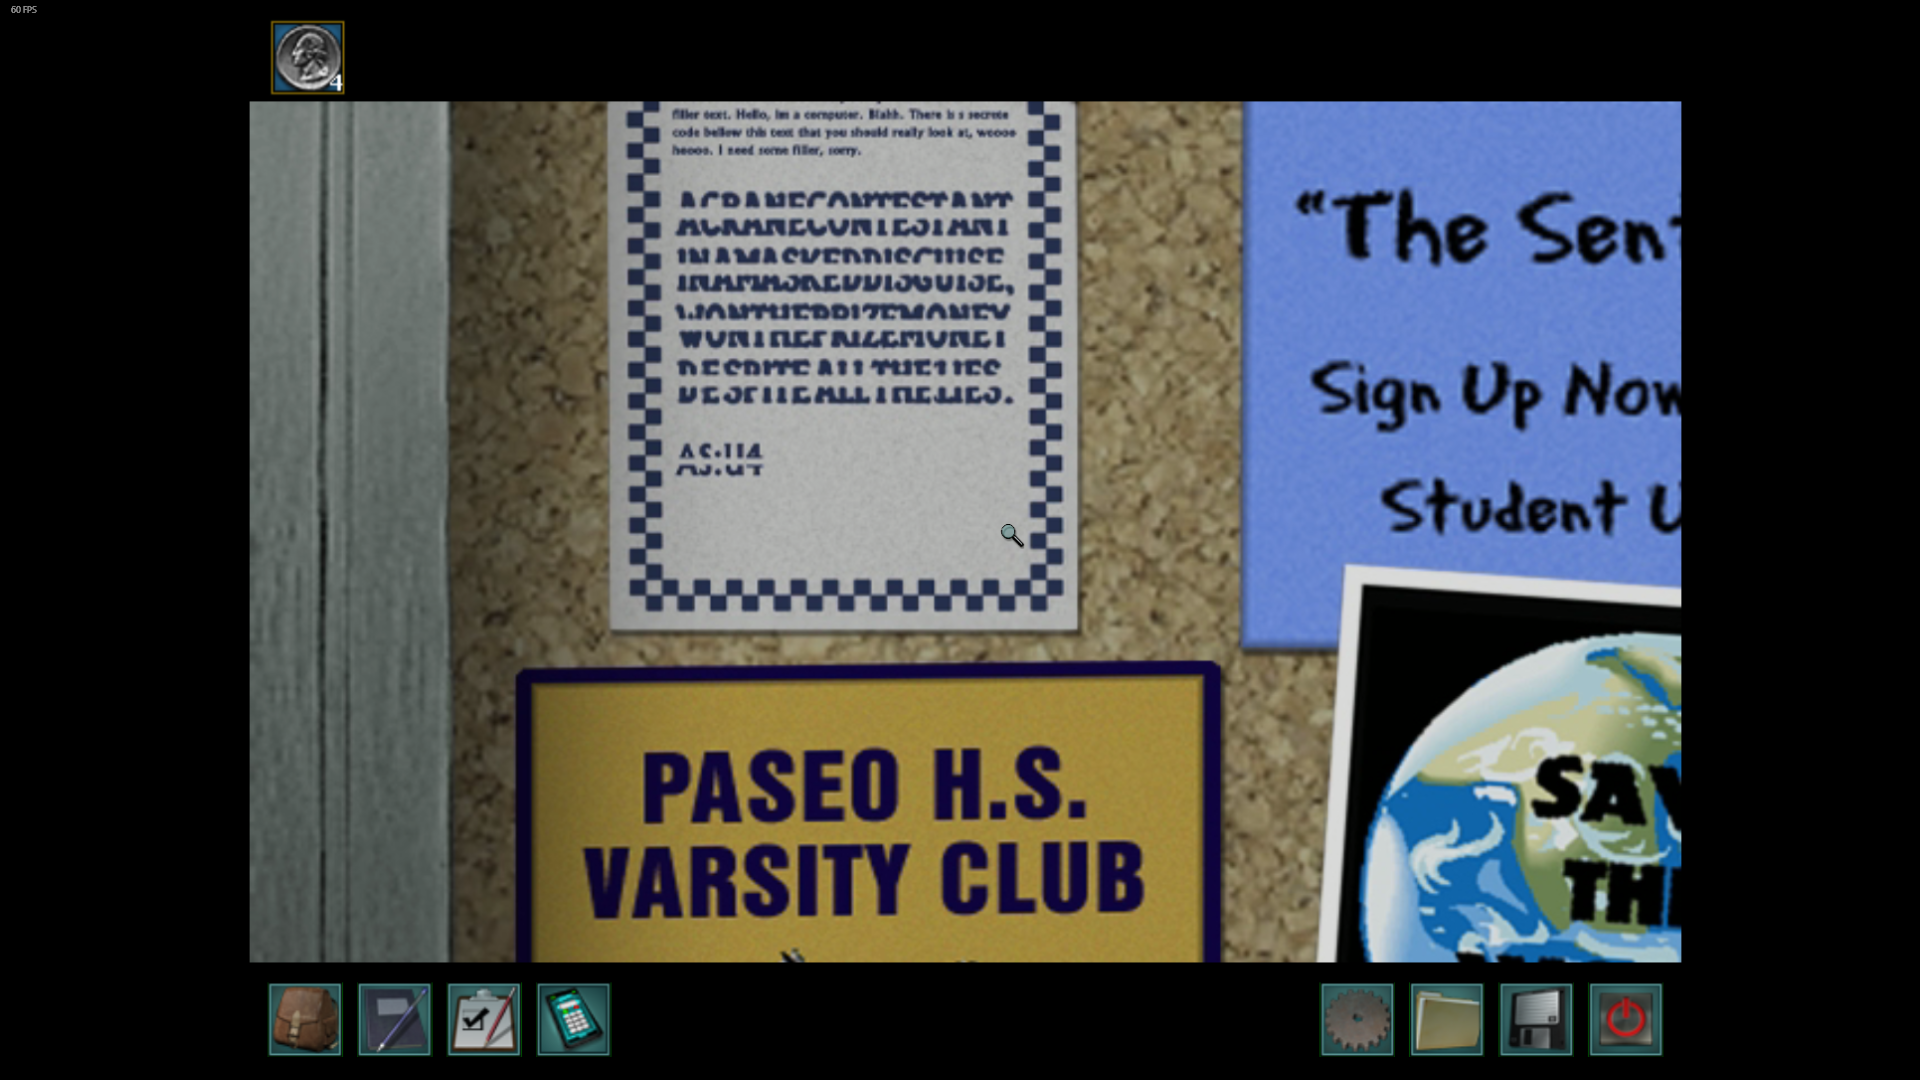
- Blue inked bulletin – AS:U4
- “A crane contestant in a masked disguise, won the price money despite all the lies.” Keep an eye out for what this might refer to!
- Doctor Deception bulletin – Hf:L1
- “Student files under lock and key will show the lies of the doctor-to-be.” Doesn’t Hal want to be a doctor? Where might we find student files? We need to get into that teacher’s lounge.
- Paseo H.S. School News bulletin – C:R1.
- Read backwards we get “The Hidden Video Tape Will Seal My Murderers Fate”
- Red bulletin – Kr:L2
- SNESNVDINROAI is unscrambled to be “Sinners on a vid”
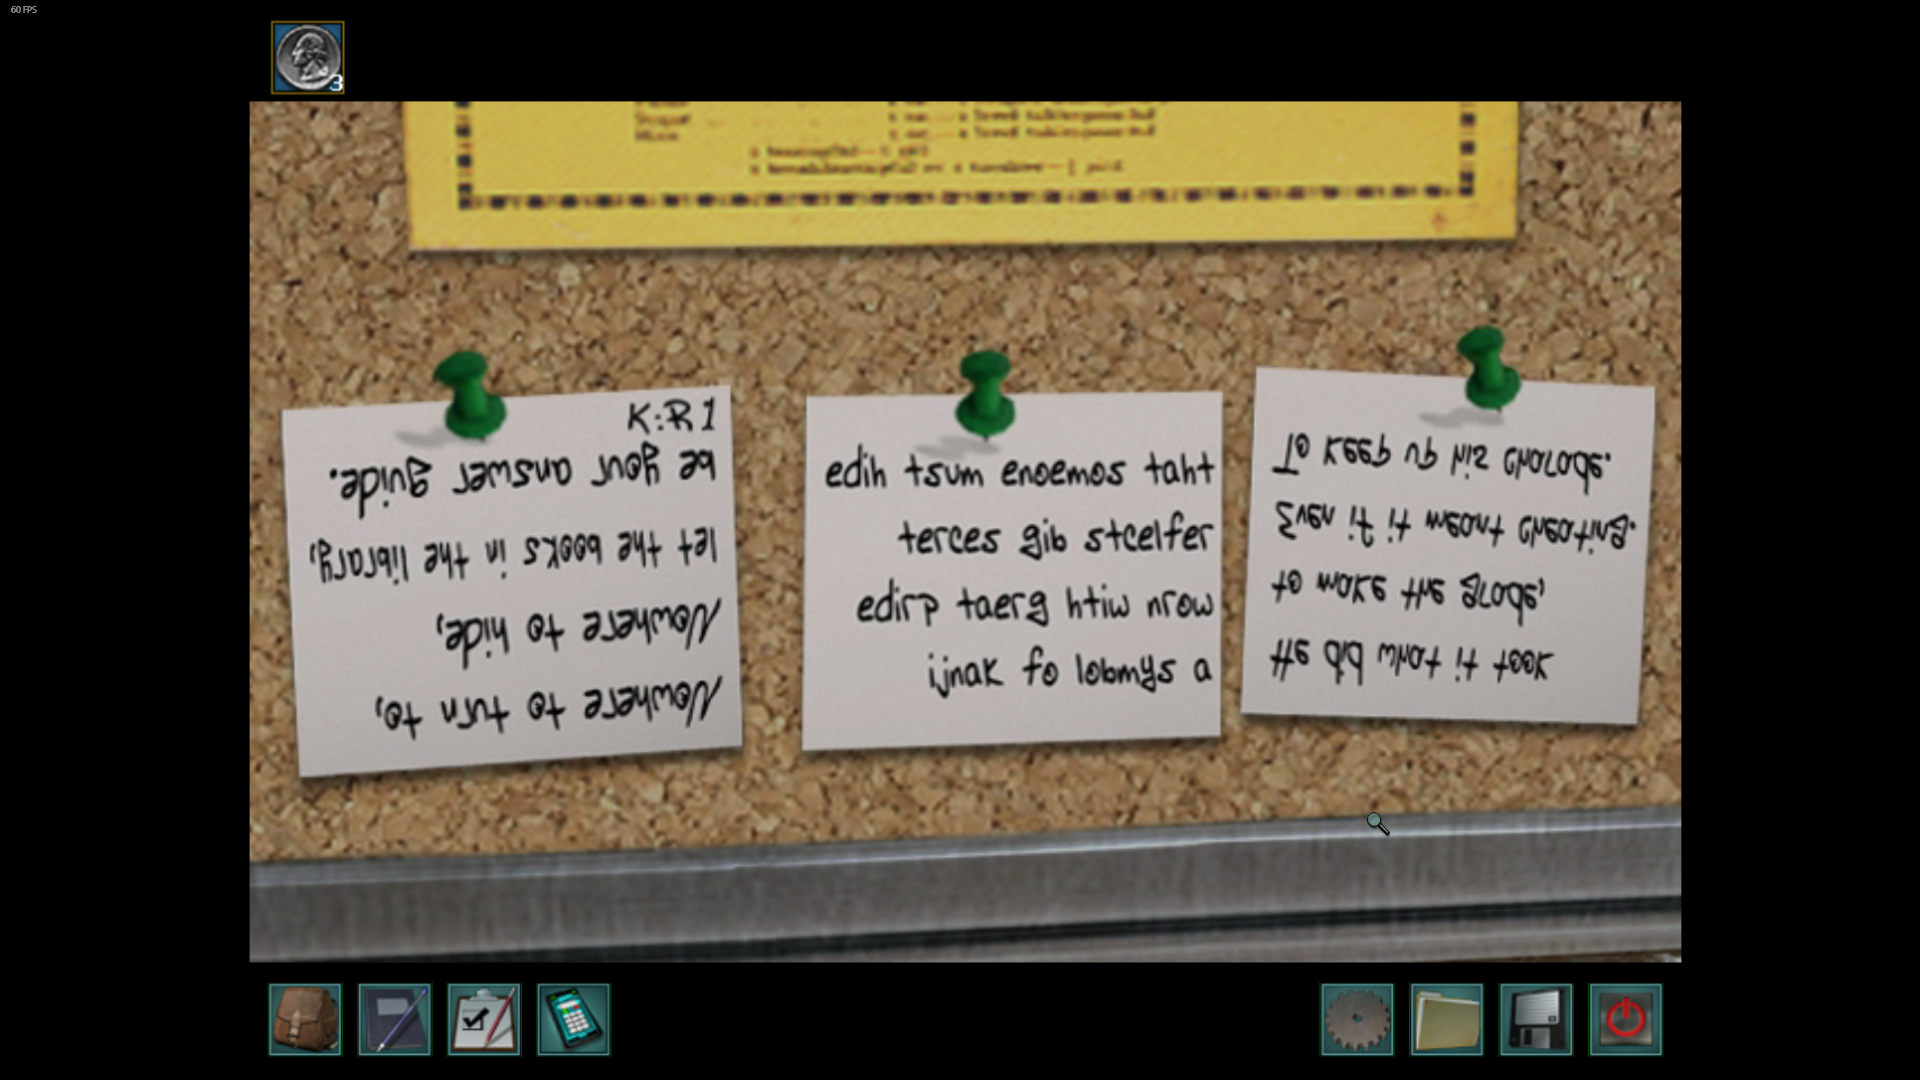
- Three Sticky Notes bulletin – K:R1
- The leftmost sticky read upside down says “Nowhere to turn to, nowhere to hide, let the books in the library be your answer guide.”
- The middle sticky read backwards says “that someone must hide reflects big secret worn with great pride a symbol of kanji.” Which character is wearing a kanji symbol proudly?
- The right most sticky note read upside down and backwards says, “He did what it took to make the grade, even if it meant cheating to keep up his charade.” Hal totally cheated!
- Red inked bulletin – La:U2
- If you go down the first column and take the first letter, it reads, “Fifth map drawer”
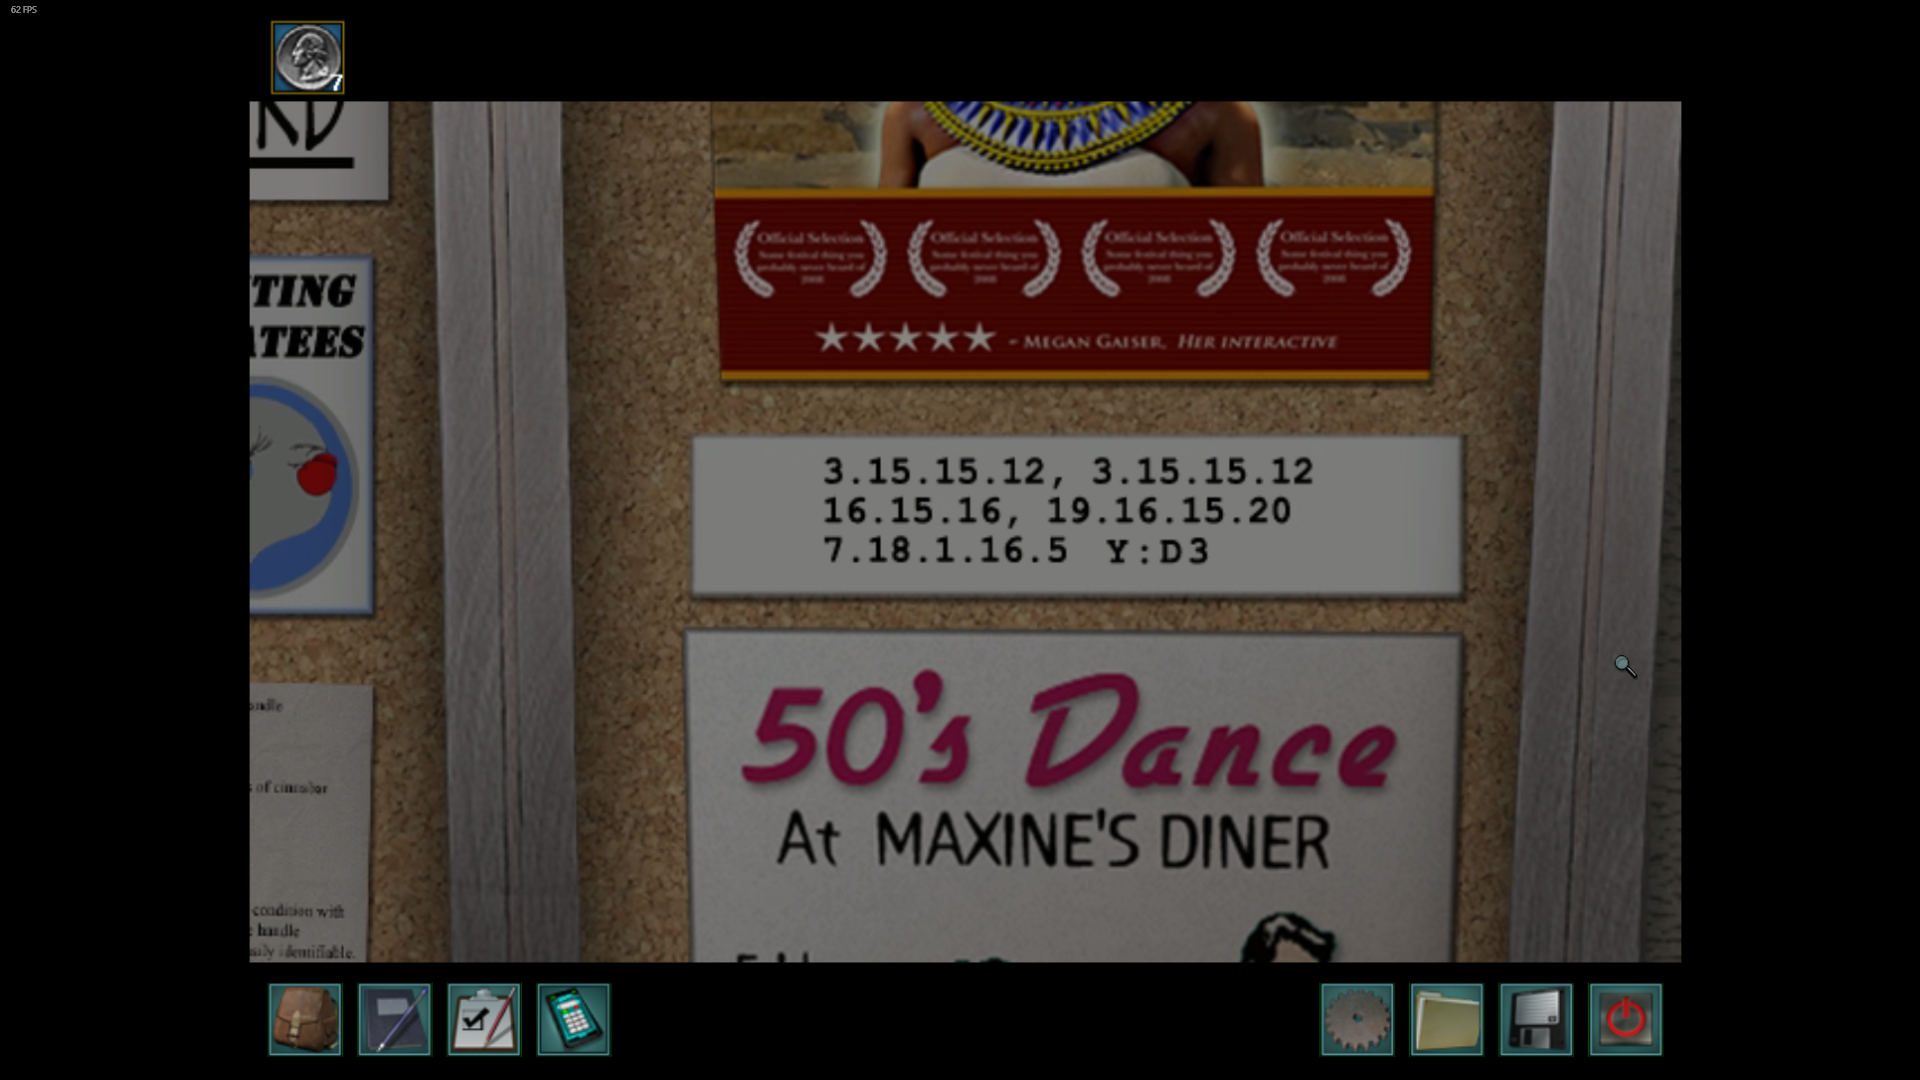
- Numbers bulletin next to the library – Y:D3
- 3.15.15.12, 3.15.15.12, 16.15.16, 19,16,15,20, 7,18,1,16,5
- if you count up the alphabet to each of the numbers you’ll get “COOL, COOL, POP, SPOT, GRAPE”
- Another soda machine code? (This will get you an Easter Egg)
- Map in the library – Na: L3
- Red letters – Ifanythinghappenstomesear
- Blue letters – chundermycomboincatalog!
- Decoded message – “If anything happens to me search under my combo in catalog!”
- Another reason to find Jake’s locker combo!
- Book near the periodic table in the library – I:U2
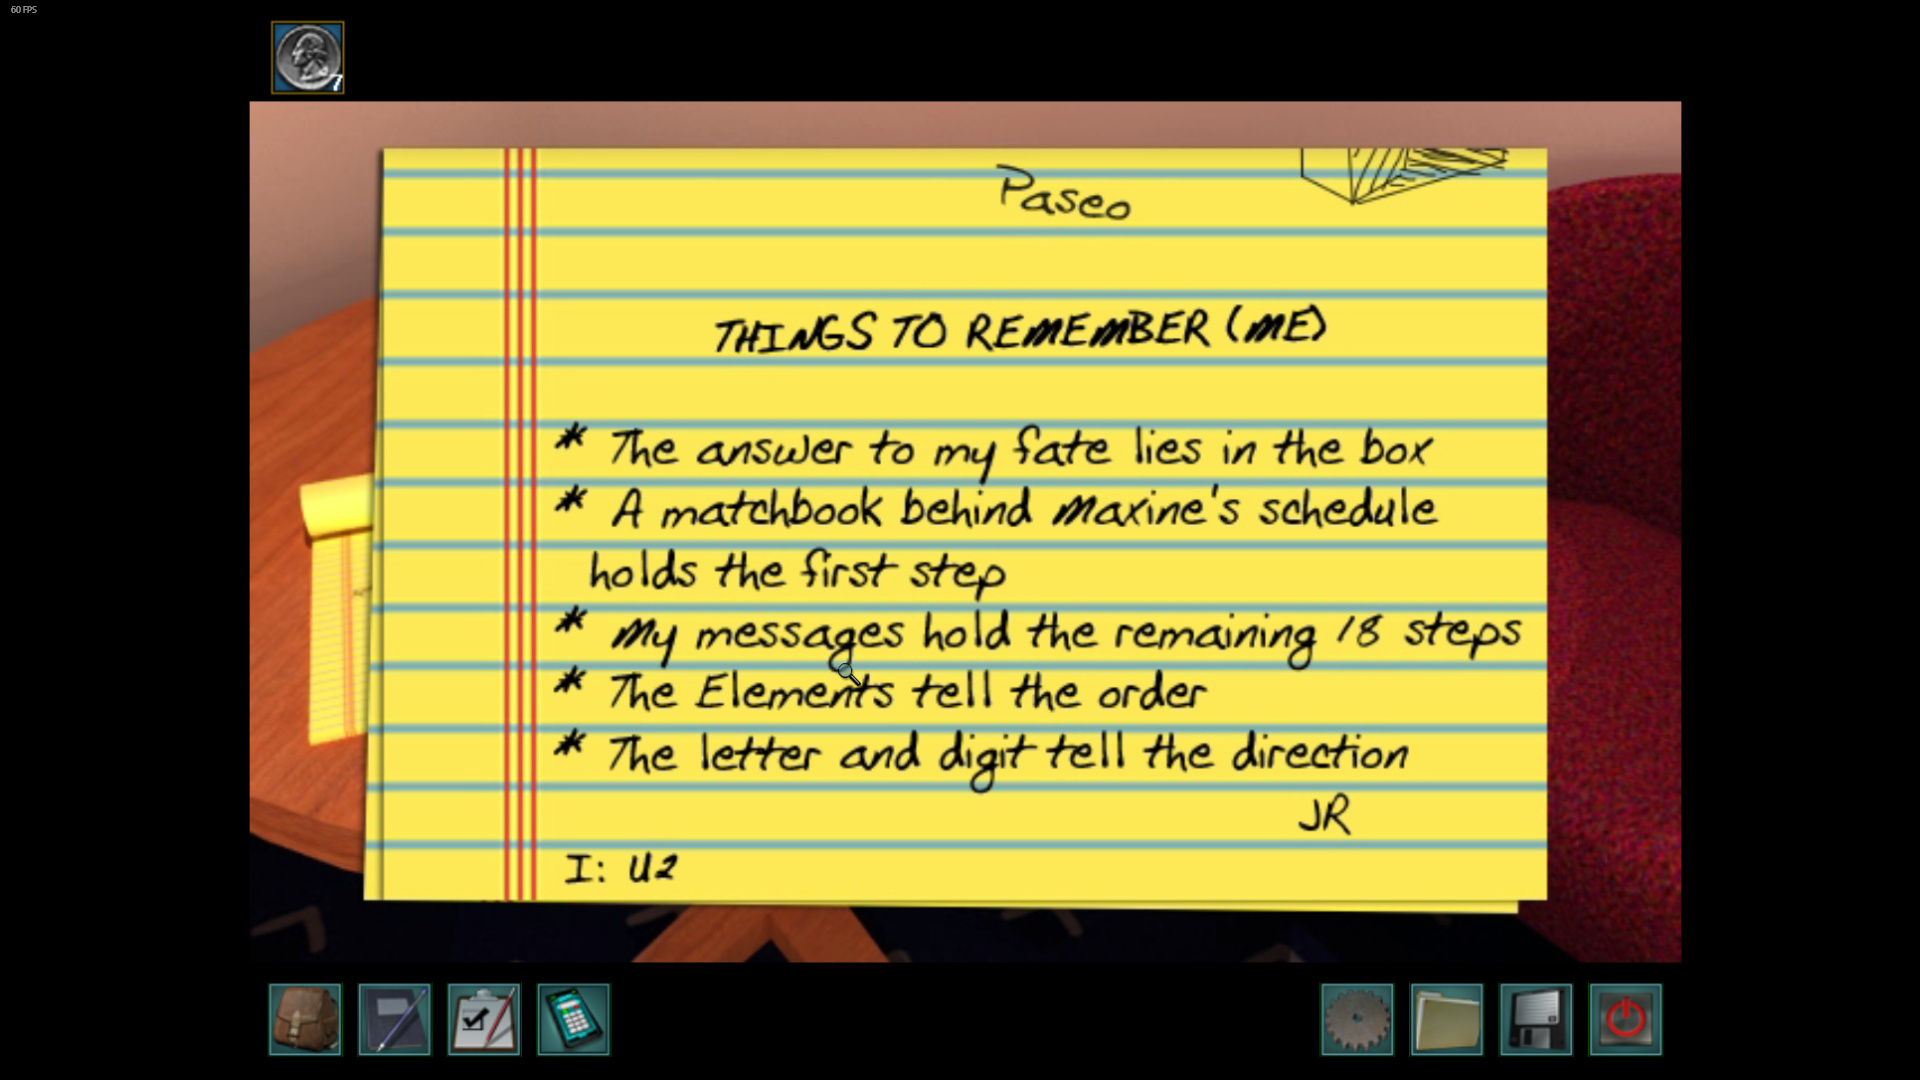
- Things to remember (me)
- The answer to my fate lies in the box
- A matchbook behind Maxine’s schedule holds the first step
- my messages hold the remaining 18 steps
- The elements tell the order
- The letter and digit tell the direction -JR
- Things to remember (me)
- Work Calendar in the Diner – Te:L3
- CEKEEEIHIGM HCYRYSGTNY
- If you zig zag up and down it spells out “check your eyesight in gym”
- Go to the eye exam poster next to the gym and read it upside down and backwards, “If anything happens to me look in my chemistry book page three zero five”
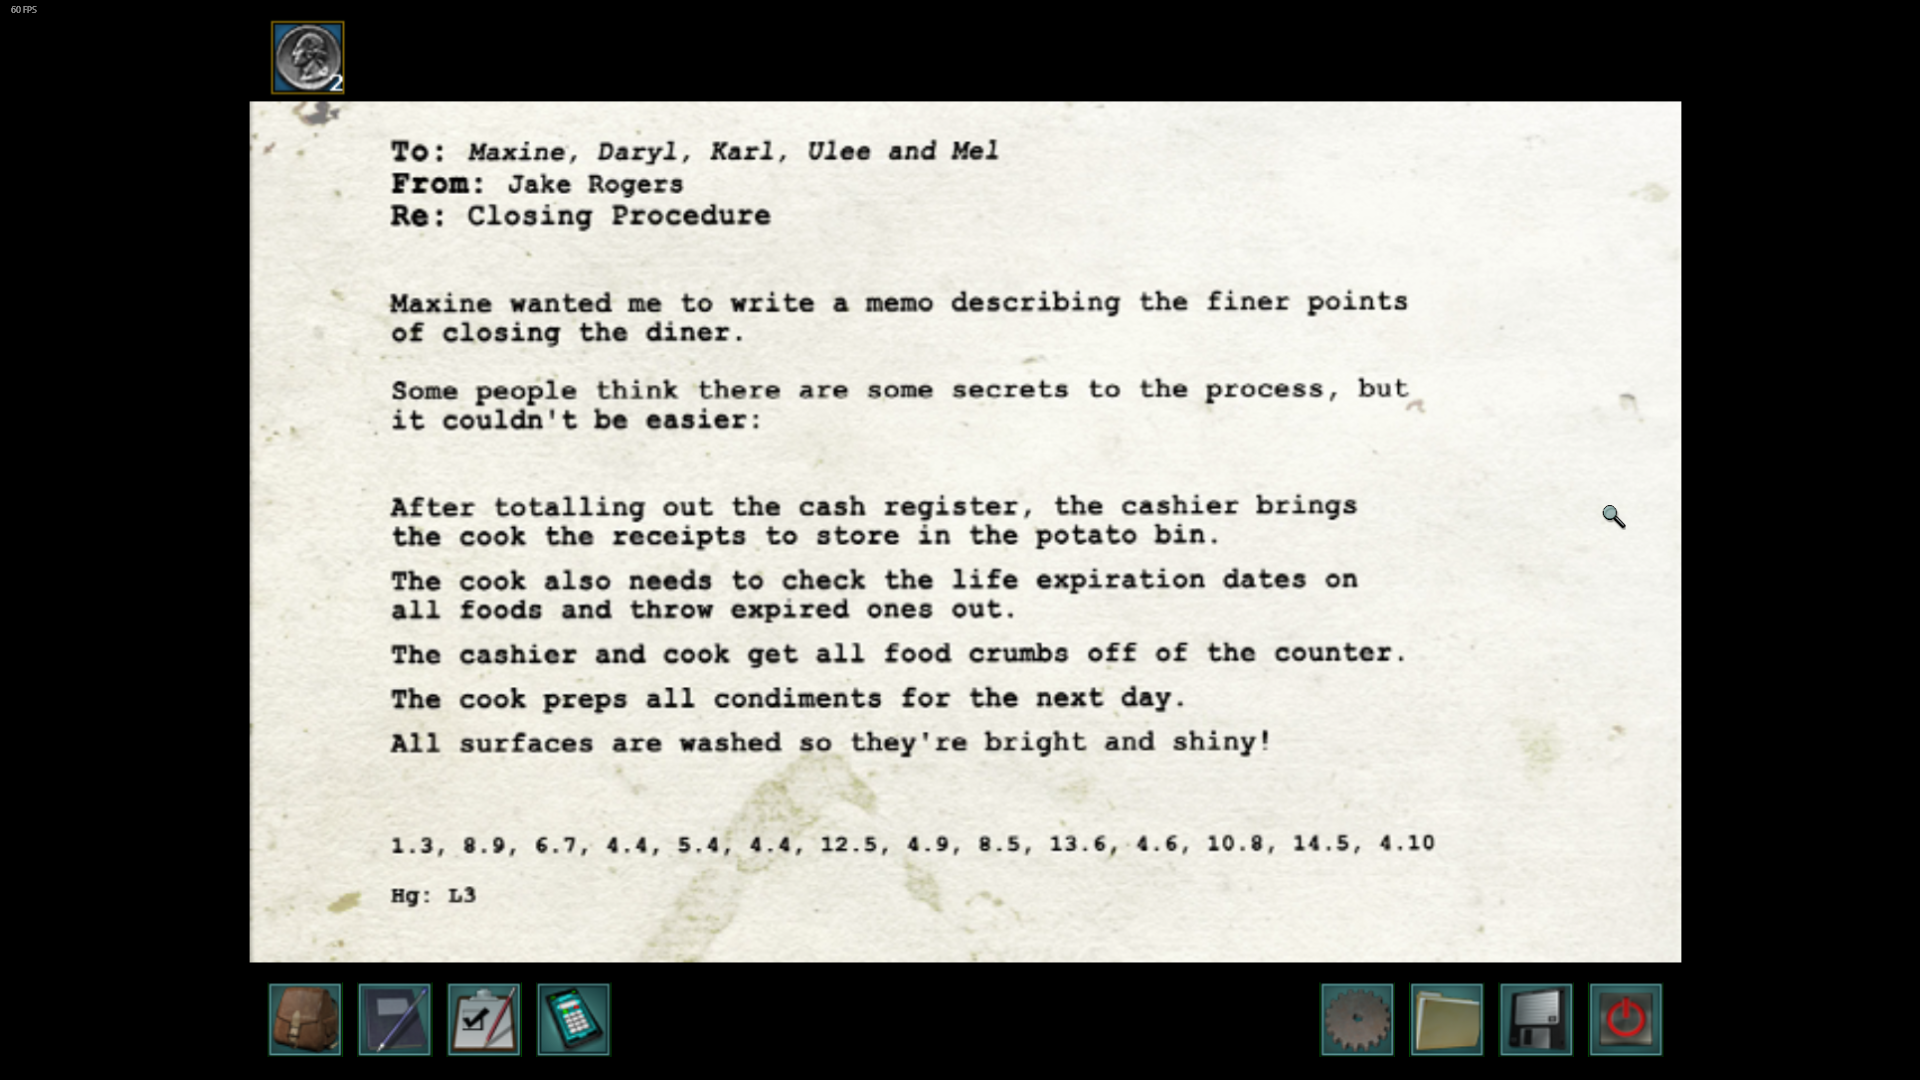
- Closing Procedures in the Diner – Hg:L3
- 1.3, 8.9, 6.7, 4.4, 5.4, 4.4, 12.5, 4.9, 8.5, 13.6, 4.6, 10.8, 14.5, 4.10
- The first number is the line on the note and the second number is the position of the word within that line.
- “Daryl brings secrets to diner to get the cash for a life so finer”
- 1.3, 8.9, 6.7, 4.4, 5.4, 4.4, 12.5, 4.9, 8.5, 13.6, 4.6, 10.8, 14.5, 4.10
- Diner Menu – Xe:R3.
- All letters – JOUHRNIISCASHSALMYCOW
- Red letters – HIS
- Green letters – JOURNAL
- Blue Letters – IS MY
- Pink letters – CASH COW
- “His journal is my cash cow”
- All letters – JOUHRNIISCASHSALMYCOW
- Teacher’s Lounge map – Ag: D1
- Around the map edges says “A Trophy Was Not The Only Price But Also Money Of A Greater Size”
- Teacher’s Lounge bulletin board – CL: D2
Jakes locker combo in the library catalog
Enter 5352 into the library computer catalog search. Jake Rogers checked out a book called Evidence under the Seat. Lets look around the library for a seat with evidence under it.
Go upstairs and look under the chair under the Periodic Table of Evidence to find a box with a bunch of alchemical symbols on it. Whatever the combination, we know it should start with that matchbook symbol.
Make sure to talk to all suspects again to see if there are new dialogue options. Detective Beech should be back in the diner so talk to him and Daryl.
How to open Jake’s box in Nancy Drew Secrets Can Kill – Final Puzzle Combo
Now that we have all 18 hidden messages, we need to use the periodic table to put the list of elements in order.

All codes from hidden messages: Zn:D1 Ir:D2 Zr:R4 He:U2 AS:U4 Hf:L1 C:R1 Kr:L2 K:R1 La:U2 Y:D3 Na:L3 I:U2 Te:L3 Hg:L3 Xe:R3 Ag:D1 CL:D2
List them according to the element’s atomic number shown at the top left of each box on the periodic table. The letter/number combo following each element corresponds to a direction and number of spots to move.
| Element | Direction | Atomic number | Step number |
| He | Up 2 | 2 | 1 |
| C | Right 1 | 6 | 2 |
| Na | Left 3 | 11 | 3 |
| Cl | Down 2 | 17 | 4 |
| K | Right 1 | 19 | 5 |
| Zn | Down 1 | 30 | 6 |
| As | Up 4 | 33 | 7 |
| Kr | Left 2 | 36 | 8 |
| Y | Down 3 | 39 | 9 |
| Zr | Right 4 | 40 | 10 |
| Ag | Down 1 | 47 | 11 |
| Te | Left 3 | 52 | 12 |
| I | Up 2 | 53 | 13 |
| Xe | Right 3 | 54 | 14 |
| La | Up 2 | 57 | 15 |
| Hf | Left 1 | 72 | 16 |
| Ir | Down 2 | 77 | 17 |
| Hg | Left 3 | 80 | 18 |
Starting with the Mercury symbol on the match book, go up 2 and hit that button. Next on the list is down 1, then left 3, and so on. Go down this list of directions until you get to the end. I know you can figure this out! When the box opens you get another video tape. Take it to Aunt Eloise’s to watch.
In the final sequence, you need to use the security on Aunt Eloise’s safe to catch the culprit. Give them all 3 wrong combinations.
Congratulations, you did it! You’ve completed the Secrets Can Kill. Now check out another Nancy Drew game, like the second game in the series, Stay Tuned For Danger.
Leave a Reply